You probably spent anywhere from $300 to $1,000 on that plastic circle strapped to your wrist, but if you are like most runners and cyclists, you are likely only using about 10% of its brain. Most of us treat our devices as glorious stopwatches that happen to track GPS, ignoring the sophisticated Garmin training features hidden just two button presses away. If you are serious about hitting a new personal record this season, your watch needs to be more than a passive tracker—it needs to be an active coach.
As of 2026, the gap between consumer wearables and professional lab equipment has narrowed significantly. The data your watch collects on Heart Rate Variability (HRV), ground contact time, and aerobic load is potent enough to dictate your entire season’s success, provided you know how to interpret it. This guide cuts through the marketing fluff to show you exactly which tools matter, how to set them up, and the specific numbers you should be aiming for to train smarter, not just harder.
Why This Matters
Training without data is just guessing, and guessing usually leads to one of two outcomes: plateauing or injury. The “more is better” mentality is the enemy of progress. By leveraging the physiological data your watch is already capturing, you can mathematically determine when to push and when to back off.
Consider this: A study of endurance athletes showed that those who adjusted training intensity based on HRV data improved their VO2 max significantly more than those following a static plan. We are talking about the difference between finishing a marathon and finishing it strong. By ignoring these metrics, you are essentially driving a car with the dashboard covered up, hoping you don’t run out of gas or overheat before you reach your destination.
1. HRV Status: Your Nervous System’s Check Engine Light
Heart Rate Variability (HRV) is arguably the most critical metric Garmin has added in the last five years. Unlike resting heart rate, which is a brute-force measure, HRV measures the time variance between heartbeats (in milliseconds). High variability means your parasympathetic nervous system (rest and digest) is in control and you are ready to adapt to stress. Low variability often indicates your sympathetic nervous system (fight or flight) is overworked.
The Coach’s Take: Don’t obsess over the daily number. Look at the 7-day baseline. If your status drops to “Unbalanced” or “Low,” your body is fighting something—fatigue, illness, or alcohol. Training hard on a low HRV day is physiologically counterproductive; you are digging a hole your body can’t fill.
How to use it:
- Wear your watch to sleep (this is non-negotiable for HRV).
- Open the Garmin Connect app on your phone.
- Go to the Performance Stats menu.
- Check HRV Status. Aim to keep your nightly average within your personal “green zone” (usually between 40ms and 100ms depending on age).
2. PacePro: The End of “Going Out Too Fast”
Most runners ruin their race in the first mile. Adrenaline spikes, you feel great, and you run 30 seconds faster than your goal pace. You pay for this with interest at mile 20. Garmin PacePro solves this by mathematically calculating your splits based on elevation.
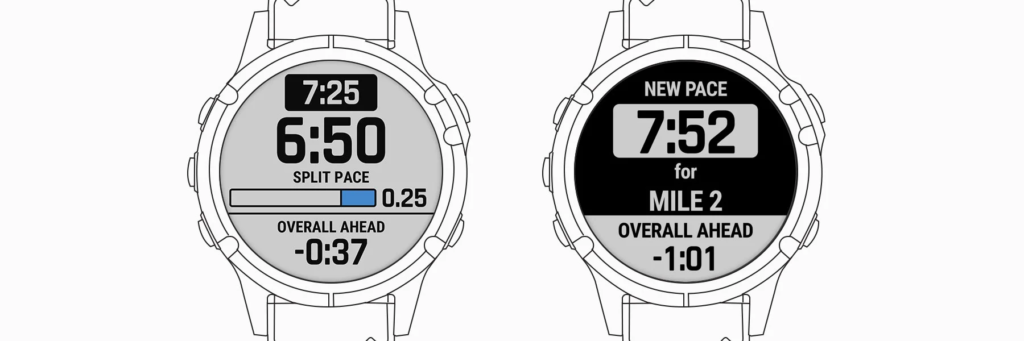
If you are running a course with a massive hill at mile 4, PacePro will tell you to slow down 15 seconds per mile on that climb and speed up on the descent, keeping your effort consistent even if your pace varies. It is far superior to a simple average pace field.
How to set it up:
- Open the Garmin Connect app.
- Tap More (iOS) or the hamburger menu (Android) > Training & Planning > PacePro Pacing Strategies.
- Select Create PacePro Strategy.
- Choose a course (or a standard distance like 5K/Marathon).
- Crucial Step: Adjust the “Pacing Strategy” slider. Slide it to Negative Split (start slow, finish fast) for the best physiological result.
- Sync to your watch.
- On race day, select Run > Options > Training > PacePro Plans.
3. Load Focus: Stop Running “Junk Miles”
Your watch categorizes every run into three buckets: Anaerobic (sprinting/power), High Aerobic (tempo/threshold), and Low Aerobic (easy/recovery). A common mistake among serious amateurs is the “black hole” of training—running too hard to recover but too slow to get faster.
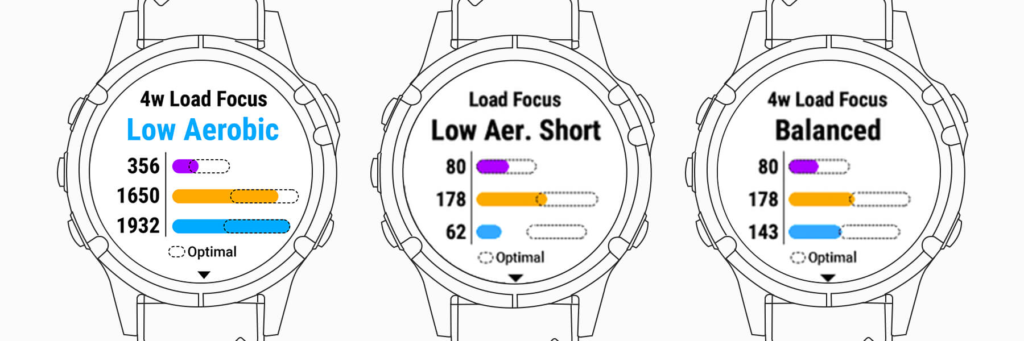
To see real gains, your Load Focus bars should be balanced. If your “Low Aerobic” bar is empty, you aren’t building the capillary density needed to fuel your muscles. If your “Anaerobic” bar is empty, you lack the top-end speed to improve your economy.
The Fix:
- Shortage in Low Aerobic: Add 1–2 runs per week exclusively in Zone 2 (can hold a conversation easily).
- Shortage in Anaerobic: Add interval sessions where your heart rate spikes above 175bpm (or roughly 90% of max) for short bursts (30–60 seconds).
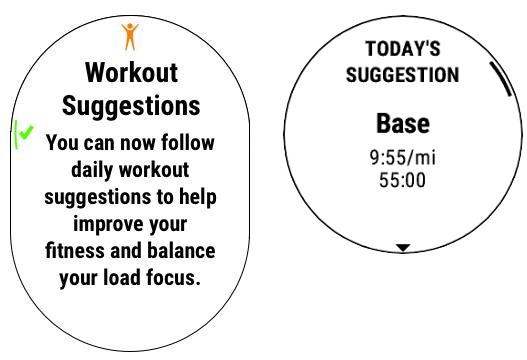
4. Daily Suggested Workouts (That Actually Adapt)
If you don’t have a human coach, this is the next best thing. Unlike a static PDF plan you downloaded three years ago, Garmin’s Daily Suggested Workouts adapt in real-time. If you slept poorly (detected via sleep tracking) or your HRV is low, the watch will scrap the planned interval session and prescribe a 30-minute recovery jog instead.
How to enable it:
- Press Start on your watch and select Run.
- If a workout suggestion pops up, press Start to view it.
- If not, hold the Up/Menu button > Training > Workouts > Daily Suggestions.
- Pro Tip: Add a specific race to your Garmin Connect Calendar. The watch will then build a periodized plan (Base, Build, Peak, Taper) specifically for that race date.
Pro Tips for Power Users
- Data Screen Hygiene: Don’t clutter your main screen with 6 fields. During a hard interval, your brain can’t process that much. Create a custom screen with just two huge numbers: Lap Pace and Lap Distance. This keeps you focused on the current interval, not the total workout.
- Get a Chest Strap: Optical wrist sensors are great for steady runs, but for high-intensity intervals, they lag by 10–15 seconds. If you care about accurate anaerobic data, pair a chest strap like the HRM-Pro.
- Running Dynamics: If you have a compatible accessory (like the Running Dynamics Pod or HRM-Pro), look at your Ground Contact Time Balance. It should be 50/50. If you see 48/52, you are favoring one leg, which is a massive precursor to injury.
The Real Downsides
While these tools are powerful, they aren’t infallible. The biggest limitation is the garbage in, garbage out principle. If your Max Heart Rate is set incorrectly in the user profile settings, every single metric (VO2 Max, Training Status, Load Focus) will be wrong. Do a field test to find your actual Max HR; do not rely on the “220 minus age” formula—it is notoriously inaccurate for fit individuals.
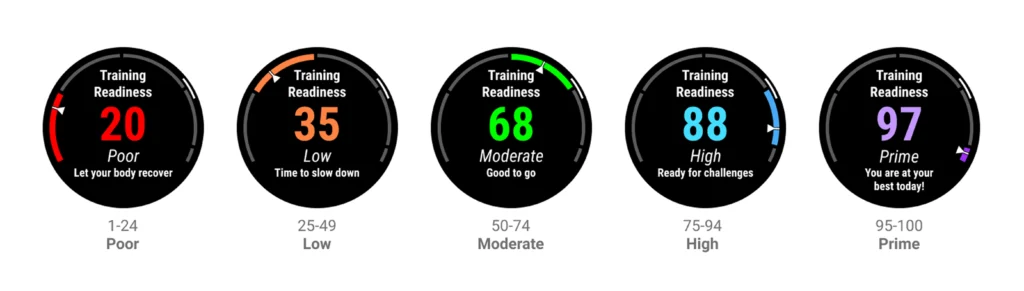
Additionally, metrics like “Training Readiness” can sometimes be overly conservative. If you feel great but the watch says “Recovery Time: 48 Hours,” listen to your body first. The algorithm doesn’t know you had a massage and a perfect meal; it only knows your heart rate history.
The Bottom Line
Stop training in the dark. You don’t need to be a professional Olympian to benefit from professional data. Here is your action plan:
- Check HRV every morning to decide if you should train hard.
- Use PacePro for any race or time trial to prevent blowing up early.
- Monitor Load Focus weekly to ensure you aren’t just running “medium hard” every day.
For most users, the standard features on a Garmin Forerunner or Fenix are enough to revolutionize your training, provided you actually listen to what the watch is telling you.